Incident Angles & The Importance of Shaping Your Subject

In this post I’ll outline some simple, but powerful tricks to help advance your imagery and although they’re samples from product shoots - they will translate to anything else. Portrait, automotive, interiors, etc.

Now let’s lay the foundation… lighting is complex, but once you understand the elements it becomes quite simple. Whether you’re photographing people, products, interiors, cars…. it all applies.

Angle of incidence is a principle that most amateurs, budding photographers, or even some professionals may not grasp yet. My goal is to explain it in a simple way for you to implement into your shoots moving forward.

You can almost think of your subject as a mirror - and a fun trick is to place a small mirror in front of your subject (best used for product) and if you’re seeing the light in the mirror’s reflection from your camera then you will end up with a glare on your subject… especially if it’s a shiny or metallic surface.

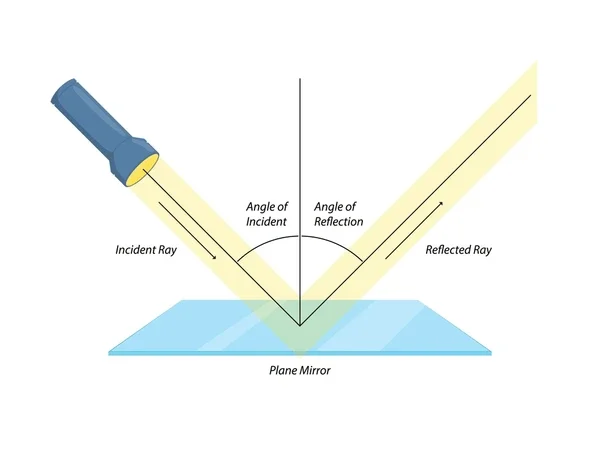
In photography, angle of incidence refers to the direction and angle at which light hits a subject, and it’s most often discussed when talking about lighting, reflections, and surface texture.

A simple rule to remember:

Angle of incidence = angle of reflection

Meaning: If light hits a surface at a certain angle, it will bounce off at the same angle in the opposite direction.

So what does this really mean and why is it important for photographers?

1. Controlling Reflections

This is huge for product, food, and commercial photography.

  • If a light source hits a shiny surface (glass, metal, packaging) at a shallow angle, the reflection will bounce directly toward the camera.

  • If you move the light higher, lower, or sideways, you change the angle of incidence and therefore where the reflection goes.

That’s why moving a light just a few inches can make glare disappear.

2. Shaping Texture and Creating Depth

The angle at which light hits a surface affects how texture appears:

  • Low angle of incidence (side light) → emphasizes texture, wrinkles, details

  • High angle of incidence (front/top light) → flattens texture, smoother look

This is why side lighting is used for:

  • Food

  • Fabric

  • Packaging embossing

  • Architectural details

3. Specular vs Diffuse Highlights

  • Specular surfaces (glass, plastic, polished metal): reflections are very predictable based on angle of incidence.

  • Diffuse surfaces (paper, skin, matte packaging): light scatters more, so the angle matters less but still affects contrast and mood.

Simple real-world example

If you’re photographing a glass bottle:

  • Light directly in front → reflection bounces straight back into camera (harsh glare)

  • Light moved to the side → reflection bounces away from camera (clean label)

  • Camera placed where the reflection lands → intentional highlight or “hero” spec

Why it matters (especially for your work)

For high-end commercial/product imagery, mastering angle of incidence lets you:

  • Eliminate unwanted glare

  • Place highlights exactly where you want them

  • Control mood, contrast, and perceived quality

  • Make reflective products look premium instead of cheap

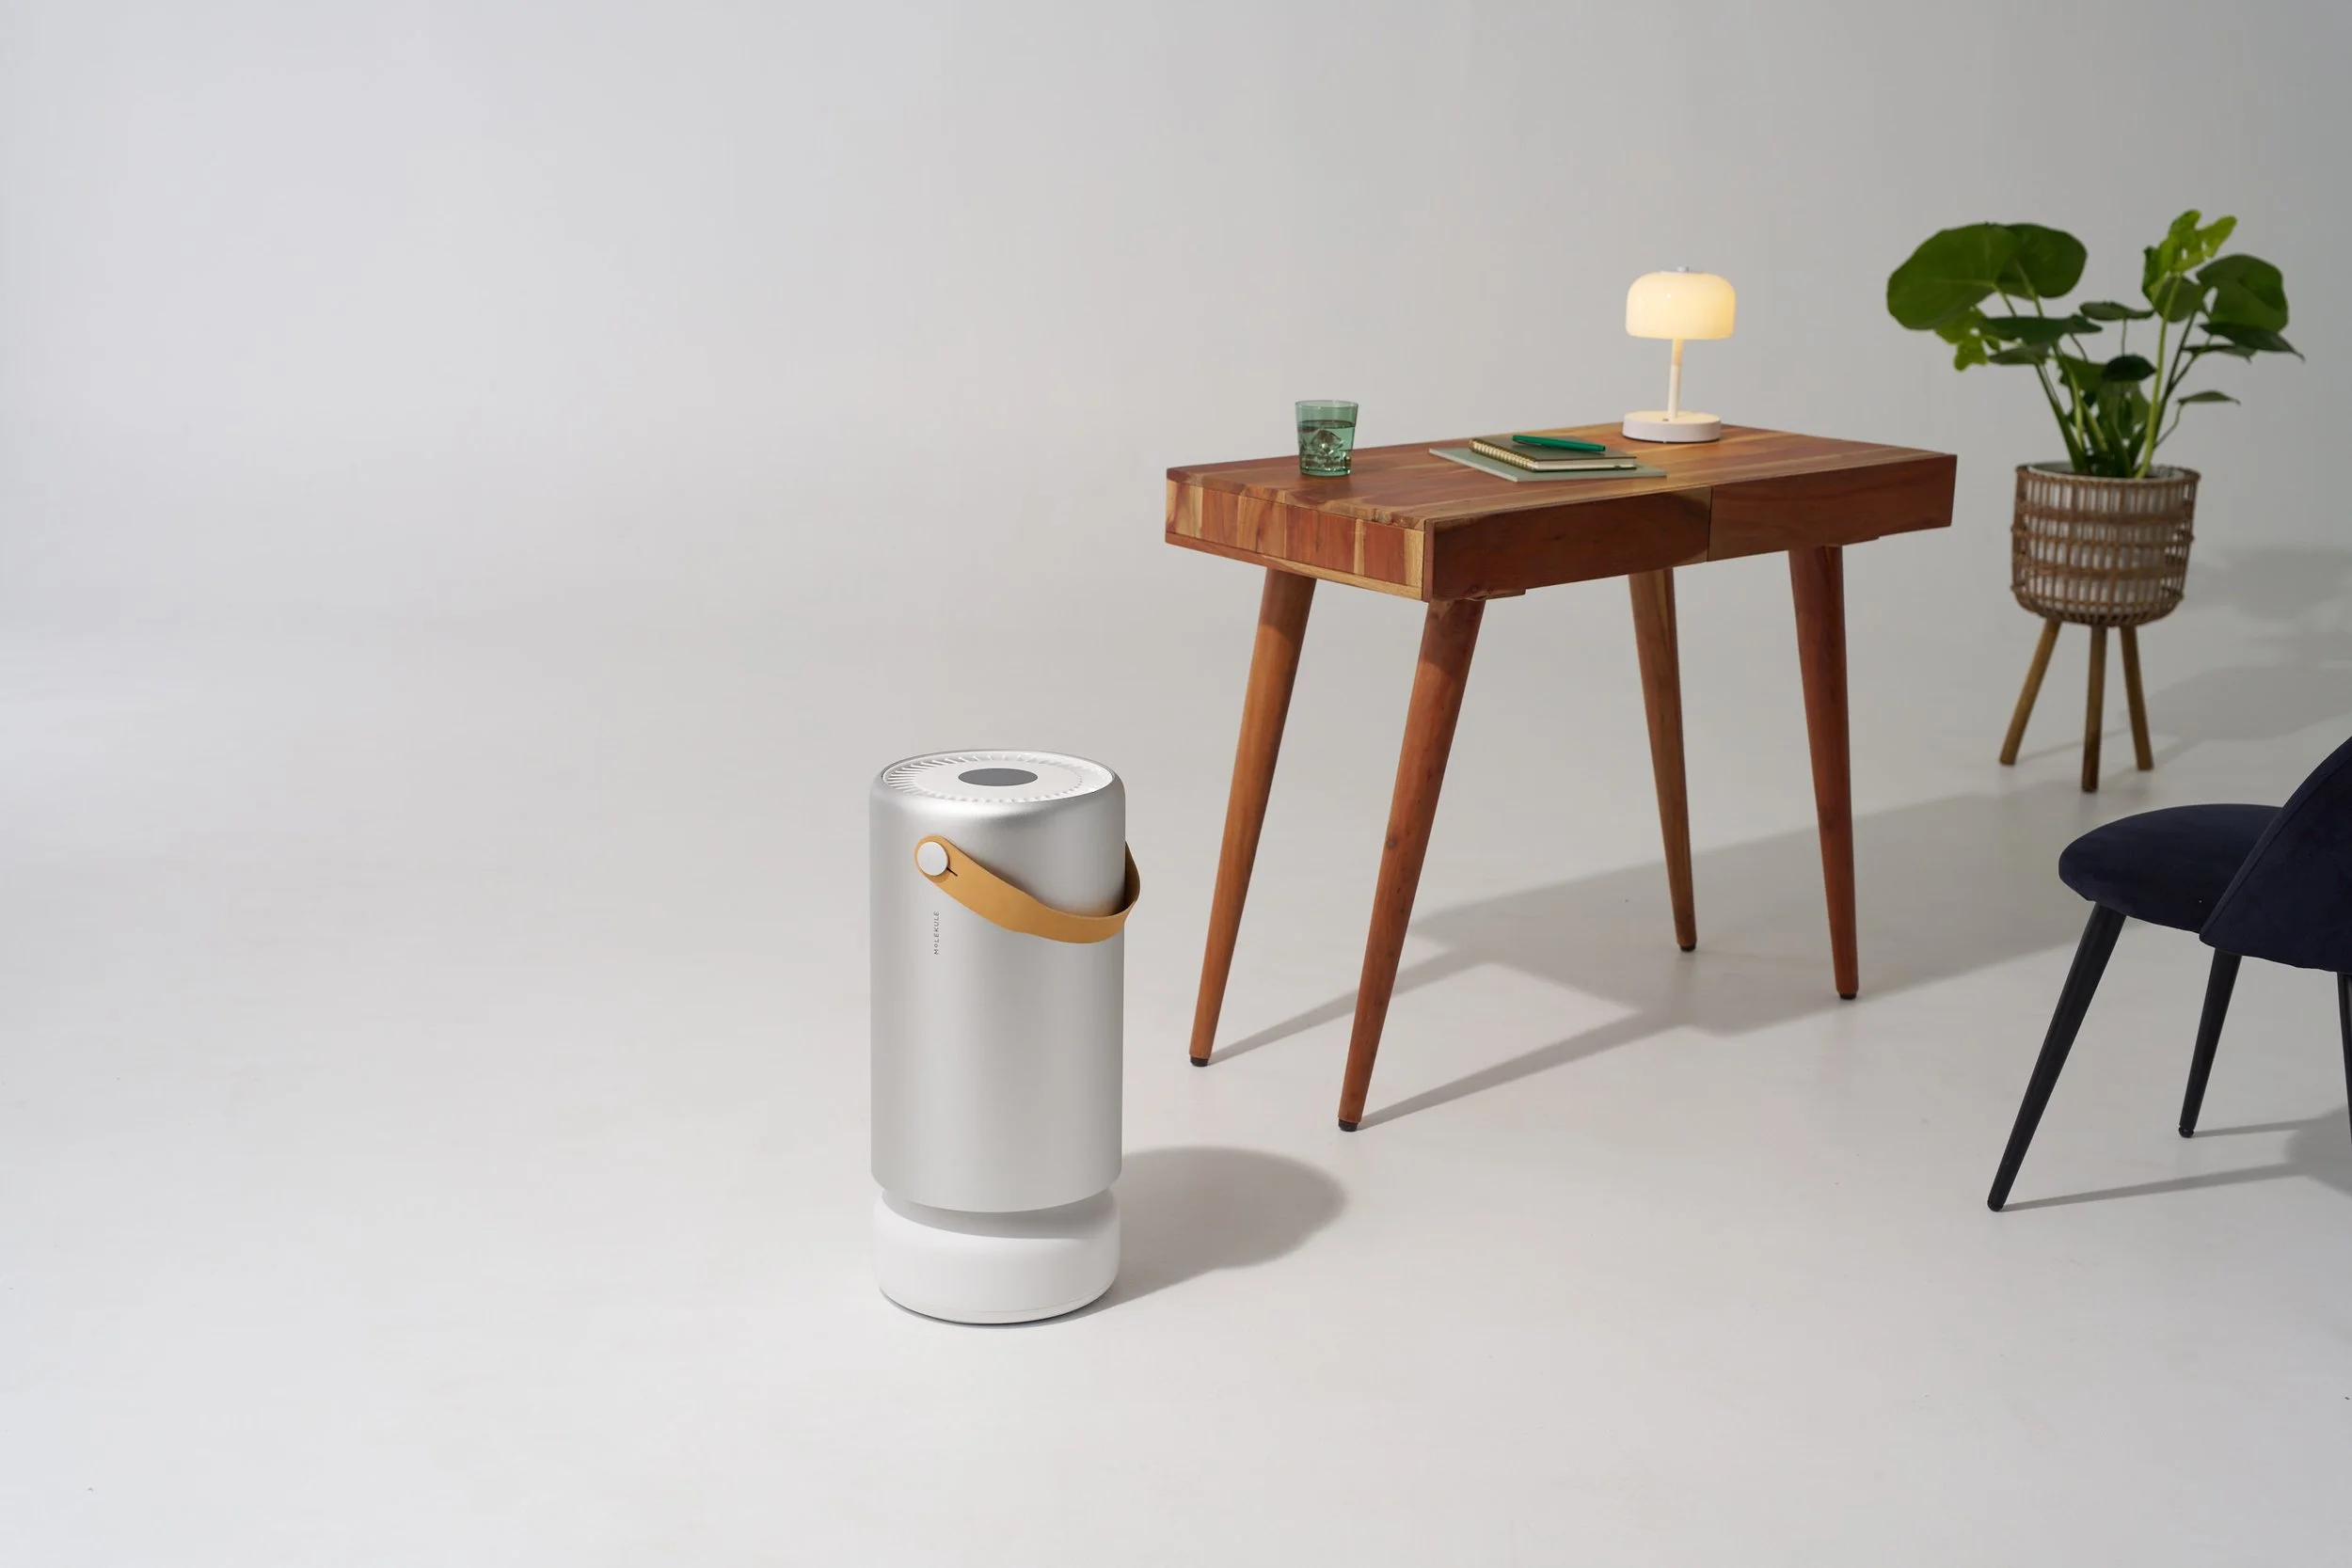
As shown in my example here, the light on the product looks good, however, since we are shooting in a white studio - the white is reflecting back into the subject, giving it a flatter look and lacking contrast. This indeed is incident angle - but it refers to the environment that your subject is in (especially with this product having a reflective surface).

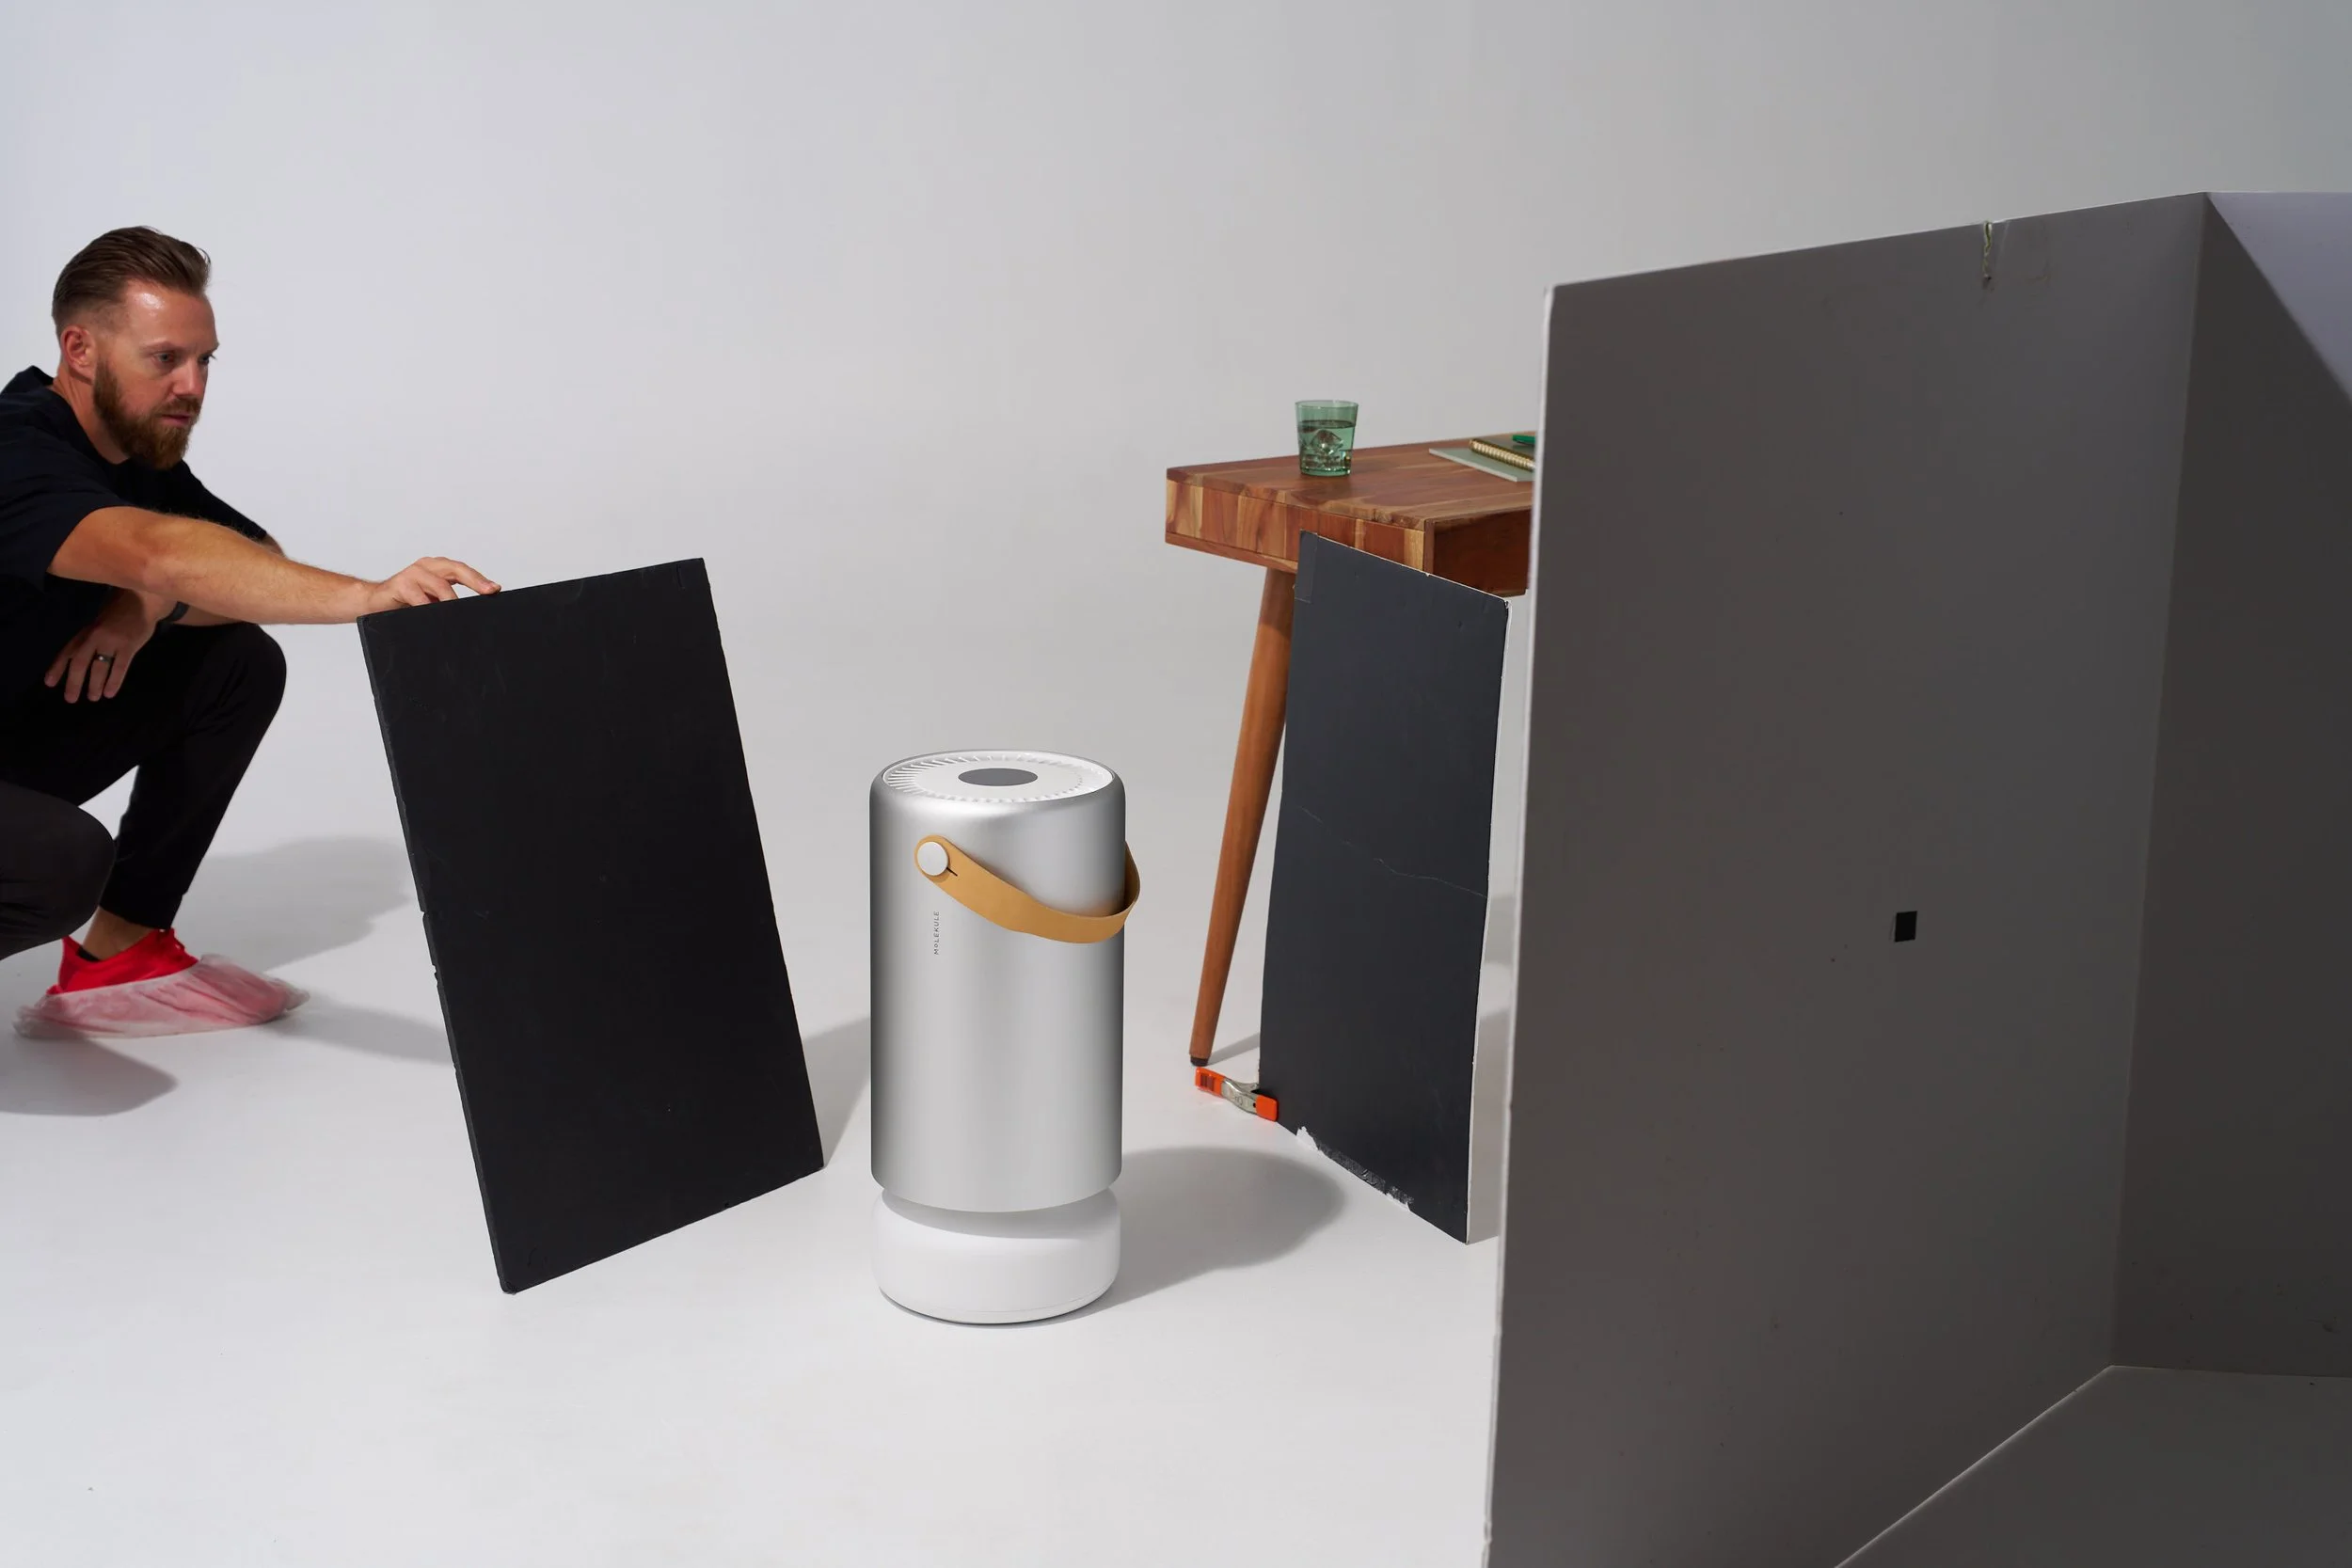
In this frame, I’m adding in black cards to better shape the product and adding contrast back into it. This helps make the product “pop” and really stand out in the scene. Client LOVED this!

Since I’m shooting on a camera stand (a really beefy tripod) - I can easily paint in the black sides on the product.

Hopefully you found some key takeaways from this post and can implement them into your next shoot!

Product Lighting Breakdown

Lighting Breakdown: How to Create Clean, Dynamic Product Images

Ever wondered how those crisp, polished product images come to life? Maybe you’ve set up your lights and dialed in your settings, but something still feels off — the reflections aren’t right, the highlights are harsh, or the image just lacks that punch you saw online.

Let’s fix that.

In this lighting breakdown, I’ll walk you through a step-by-step setup that creates a dynamic, yet repeatable look you can use across a wide range of product shoots. It’s all about understanding how light behaves — and how to shape it intentionally.

The Setup: Two Lights, Two Purposes

I’m using two lights here, each with a distinct role.

Key Light: My main light source is a Godox AD600 Pro modified with a 7-inch silver reflector. This is a relatively small modifier, which creates a more focused, specular highlight. The silver lining inside the reflector boosts contrast and adds a punchy, hard quality to the light — perfect if you’re aiming for a bold, high-impact look. If you’re going for texture and want to emphasize the shape and sheen of your product, this modifier does a great job.

AD600pro on 1/8 +.5 power

Fill Light:For the fill, I’m using another AD600 fitted with a strip box, which is then shot through a 4x4’ diffusion panel. The strip box itself includes both an internal and external white baffle, helping to soften and spread the light evenly. That extra layer of 4x4 diffusion gives the light a silky wrap and helps eliminate any distracting harsh reflections — especially important if you’re photographing reflective or glossy surfaces. It also introduces a beautiful, clean edge to your highlights without overpowering your key.

AD600pro on 1/16 power

Final Thoughts:
I thought by adding in each frame, you can clearly see the properties of what each type of light is producing. The key/specular light provides direction, contrast and texture. It helps highlight the water beaded up on the can and provides a “fresh” feel. The fill/diffused light helps showcase texture in a different way. It shows the metallic property of the can, and without a large diffused source, you’ll miss that key feature.

The key to building compelling product imagery is consistency — not just in lighting, but in how you think about shaping light. By understanding how hard and soft light interact, and where to place your modifiers for the most flattering result, you can turn a simple product into something scroll-stopping.

Here’s the finished, fully retouched image.

Sony A7RV + Sony 28-70mm ƒ/2 GM shot @ 70mm

1/640 - ƒ/5.6 - ISO 200

Have questions or want to see a visual breakdown? Drop a comment or shoot me a message — I’m always happy to help fellow creatives level up.

The Benefits of Natural Lighting vs Artificial Lighting for Photography

The Benefits of Natural Lighting vs Artificial Lighting for Photography

The use of proper lighting is essential in creating beautiful and stunning photographs regardless of whichever subject you are shooting with. Lighting can affect the mood, tone, and color of the images. In photography, there are two main lighting sources: natural and artificial. Natural lighting refers to the light that comes from the sun, while artificial lighting is produced by man-made sources such as strobes, continuous lighting, LEDs, or even lamps. In this post, we will discuss the benefits of natural lighting over artificial lighting, and how to take advantage of it to enhance the quality of your photos.

Natural light is easily accessible

One of the most significant advantages of natural light is that it is abundant and can be utilized for photography for a good 10-12hrs each day. The sun is a naturally specular light source, which means you may have to modify or manipulate it. A specular light implies that the light being produced from the source is harsh and rather intense. If you look at any shadow in an image, this is a key characteristic of specular light - hard shadows with defined edges. You can use a reflector on the opposite side of your light source to help fill in shadows on your subject if the natural sunlight is producing hard shadows. You can also use some form of diffusion to put between the sun and your subject - the DIY way of doing this would be to use a shower curtain or something that has a frosty effect. I’ve seen many DIY videos of people fabricating some pvc pipe to make a square or rectangle frame and attaching the diffusion material to this with gaffer’s tape. For anyone who’s curious on what that process might look like, here’s a sample link. This will help give a softer look to a portrait or provide large, clean highlights on reflective products.

Here are some images I grabbed of my wife, Melissa, on our honeymoon in Kauai with only using natural light. Sigma Art 35mm ƒ/1.4 were used on images 1, 2, and 4. My 70-200mm ƒ/2.8 achieved the creamy background and compression for shot number 3. Both series of images were shot as the sun was already down, that’s why it’s very soft and has a warm glow and you really can’t identify shadows by the base of her feet.

Natural light provides a sense of depth and dimension

Natural light can also create a sense of depth and dimension in photographs. The way the sunlight falls on the subject can create a shadow or highlight, which can give the photo a three-dimensional look. Moreover, natural light can also reveal texture and patterns in the subject, making the photo more appealing and intriguing.

Natural light is cost-effective

Another advantage of natural light is that it is cost-effective. You don't have to spend money on expensive lighting equipment or rent a studio to achieve good lighting. All you need to do is find a good location with ample sunlight, and you're good to go. Also, natural light is available everywhere, whether you're shooting outdoors or indoors near a window.

Natural light is versatile

Natural light is also versatile, as it changes throughout the day. The quality and intensity of the light depend on the time of day, weather conditions, and location. You can take advantage of different lighting conditions to create many different moods and styles in your images. For example, you can shoot during the golden hour, when the sun is low in the sky, to achieve a warm, glowing effect. Alternatively, you can shoot during the blue hour, when the sun has set but the sky still has some light, to create a dramatic and moody atmosphere.

Natural light can improve your skills

Finally, using natural light can also improve your photography skills by forcing you to adjust on the go. Since natural light is constantly changing, you need to be able to adapt to these changes and adjust your camera settings and compositions accordingly. This requires a good understanding of exposure, composition, and lighting, which are all essential skills in photography. Additionally, using natural light forces you to be creative and resourceful, as it challenges you to find the best lighting conditions in any given situation.

Natural lighting has a lot of benefits for photography, from enhancing the mood and tone of your images to improving your skills as a photographer. After all, we have seen natural sunlight our entire life so it’s only natural that we have an affliction for it. However, it's important to remember that natural light is not always available or practical, especially when working indoors or in low light situations. In these instances, you may need to use artificial lighting to achieve the desired look. The key is to understand the strengths and limitations of both natural and artificial lighting and use them to your advantage. By doing so, you can create stunning images that capture the beauty and essence of your subject. Lighting is often times a defining factor when determining someone’s styles and could be a reason why clients gravitate towards working with you.

Artificial lighting enables you to dial in a scene and keep it consistent as long as your light and settings don’t change or move. Shooting with lights in a studio sort of gives you a blank canvas in terms of being creative. You can add props, colored gels over your lighting, and use modifiers to really help dial in the mood you’re looking to create. Using lighting on-location is also very dynamic because you can balance your exposure with your lighting to create some interesting looks. I would argue that artificial lighting is more versatile than natural light because you have a wide array of modifiers to use depending on which need you have. You can control the power of each light to your liking in order to control the scene you are crafting. Most continuous lighting setups include a RGB or Kelvin temperature dial so you don’t even need colored gels in some instances when altering the color of your lights.

Below are a few different looks that I created for my client in a short studio session - something that would be nearly impossible if trying to do with natural light only.

If this is your first time using lighting, I’d recommend to begin slow and only use one light. This helps reduce the complexity of your setup and if you are working with a friend, hopefully they are patient with you testing shots in order to get the exposure where you want it. When pairing one light with an on-location portrait, it’s easy to create a dynamic look by having your model or subject turn their back to the sun, and then you fill in the shadows with a strobe. You instantly add a nice dynamic when dialing in your exposure to use the sun as an edge light and your strobe up front as a key light. The further your key light becomes off camera axis, the more dramatic and shadows you will encounter on your model. Test this out and move the light around to see what kind of looks you can create before just putting the light in one place and you begin to fire away.

Hopefully you found some useful info in this discussion regarding the differences and pros and cons of using natural light and artificial lighting. Please let me know what you’d like for me to discuss in upcoming blog posts. Thanks for stopping by!

Much love,

DJ